Friday, November 18, 2011
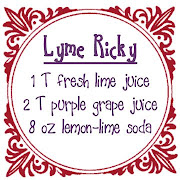
Incredibly Easy (and tasty) Risotto in 15 minutes!
Sunday, November 13, 2011
Taco Soup
Here is my favorite recipe for taco soup. I really prefer the Old El Paso mild taco seasoning flavor, I think it's the best tasting of the prepared packets.
I think of this soup as a dump soup -- you just dump all the ingredients into a pot and let it simmer until you are happy with the taste. This one is incredibly healthy and tasty at the same time.
2
|
lb
|
ground
beef, browned & drained
|
3
|
cups
|
onion
|
2
|
can (15
oz)
|
kidney beans
|
2
|
can (15
oz)
|
black beans
|
2
|
cans
|
corn
|
6
|
can(28
oz)
|
tomato, diced
|
3
|
package
|
taco seasoning
|
1
|
carton
|
beef
broth
|
Serving size: 1/22 of a recipe (16.9
ounces).
Percent daily values based on the
Reference Daily Intake (RDI) for a 2000 calorie diet.
Nutrition information calculated from
recipe ingredients.
|
| ||||||||||||||||||||||||||
Wonderful pumpkin cookies
I don't even like pumpkin. Really. I don't. Having said that, these pumpkin spice cookies are amazing! My family loves them! Give them a try, you won't be disappointed!
Friday, November 4, 2011
Fall 2011 Quilt Festival Entry -- Schnibbles Plan C
I miss the quilt, but I'd trade it again in a heart beat for the wonderful trip and the great adventure. Thanks Anne & Jens!
I love the Bloggers Quilt Festival! This one of my most favorite times of the year. Click on the logo to join in the fun!
Sunday, October 30, 2011
Sugar Cookie Frosting
Sunday, October 23, 2011
Sugar Cookies
In addition to great tasting dough, these make the best sugar cookies I've ever tasted, very similar to a pink frosting cookie sold in stores.
There are two tricks to baking these cookies.
First, be sure to combine the butter & sugar and beat until very light in color. Add the eggs and beat until fluffy. Don't rush this step!!!!
The second important step is to take them out when they've just finished baking. If you wait until they turn brown, the cookies will be very dry and crumbly.
Monday, September 19, 2011
Books for Young Readers
Good luck!
A Boat to Nowhere
A Wrinkle in Time
Al Capone Does My Shirts
All-of-a-Kind Family
Amber Brown is Feeling Blue
Because of Winn-Dixie
Beezus and Ramona
Breaking Through
Call it Courage
Charlie and the Chocolate Factory
Charlotte's Web
Chronicles of Narnia series
Dying to Meet You
Ella Enchanted
Emily Windsnap series
Encyclopedia Brown and the Case of the Secret Pitch
Encyclopedia Brown Boy Detective
Encyclopedia Brown Finds the Clues Encyclopedia Brown Gets His Man
Fairy books by Daisy Meadows
Fever 1793
Freak the Mighty
From the Mixed-Up Files of Mrs. Basil E. Frankweiler
Harriet the Spy
Harry Potter and the Chamber of Secrets
Harry Potter and the Deathly Hallows
Harry Potter and the Goblet of Fire
Harry Potter and the Half-Blood Prince
Harry Potter and the Order of the Phoenix
Harry Potter and the Prisoner of Azkaban
Harry Potter and the Sorcerer's Stone
Hattie Big Sky
How to Eat Fried Worms
Indian in the Cupboard
Inkheart
Inkspell
Island of the Blue Dophins
James and the Giant Peach
Knights of the Round Table
Little Women
Misty of Chincoteague
Mrs. Piggle Wiggle
Mysterious Benedict Society
Nancy Drew Clew Crew books
Number the Stars
Old Yeller Oliver Twist
Percy Jackson
Peter and the Starcatchers
Rainbow Magic fairy books by Daisy Meadows
Ramona Quimby, Age 8
Ramona the Pest
Red Scarf Girl: A Memoir of the Cultural Revolution
Saddle Club books
Seedfolks Shiloh
Sister's Grimm Summer of the monkeys
Summer Reading Is Killing Me!
Superfudge
Tales of a Fourth Grade Nothing
The Adventures of Tom Sawyer
The City of Ember
The Enormous Crocodile
The Fairy Painting The Ghost,
The White House and Me
The Hunchback of Notre Dame
The Indian in the Cupboard
The Invention of Hugo Cabret
The Penderwicks
The Princess Tales
Treasure Island
Tuck Everlasting
Where the Red Fern Grows
Saturday, July 9, 2011
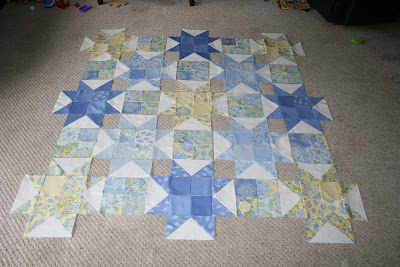
Plan C finished! Renamed Plan Copenhagen

Plan Copenhagen
71.5 x 71.5 inches
Finished June 2011
I started this quilt in July 2010. The fabric had been a Christmas Gift from Santa in my stocking, but it took a few months until I figured out what I wanted to make with it. This quilt is made from a pattern in the Schnibbles book by Carrie Nelson. Love that book! The pattern went together fairly quickly. I loved the way the stars started to pop out, even before the white was added.


It was so large, my living room floor wasn't quite big enough to get a clear picture. The quilt sat in my storage room for months! I couldn't figure out how I wanted to quilt it, so I just left it alone. Then, I had grand ideas that I would finish all my quilts that are just sitting waiting to be quilted while I recovered from foot surgery. That didn't happen! They're still downstairs waiting to be quilted.
But, in May my husband was asked to go to Denmark to take a class. A wonderful family offered up their home as a place for my husband and his colleagues to stay for a month while they took their class. I am amazed at their generosity! This quilt came to mind -- to me it just says 'Denmark'. That's also why I changed it's name to Plan Copenhagen -- just seemed to fit. :)
So, I finally had a reason to push myself to finish it. I quilted it in the first two weeks of June and it was ready to fly to Copenhagen.
I stippled it with really tiny flowers and leaves. I have to admit, the quilting was not exactly as I like it. I did it really tight together, which makes it difficult to see the design. Oh well. Live and learn.
The quilt flew in my suitcase to Denmark and now resides in this adorable little house outside of Copenhagen:
This is a picture of the summer guest house out back. We actually stayed in the basement of the big house, but the guest house just looks so Danish I had to include it here. :)
Thanks Annie & Jens -- we had an absolutely lovely time! We loved every minute in your home and in your country. Thank you for being so kind to share it with us. Hopefully this quilt will help you to remember over time how much we truly loved it! Thanks!
Tuesday, December 28, 2010
Twin Quilts

 I made these two quilts for family this Christmas. I tried out some new quilting, but forgot to take pictures of the quilting itself -- we had to hurry and snap these pictures before they got shipped off for the holidays.
 Monday, December 27, 2010
Thank you!
 During the Blogger's Quilt Festival, I was fortunate enough to win a fat quarter pack of Thistledown from Jillily Studios. What luck! This is the first prize I have won in years!
Thank you Jill! I really appreciate your generous gift -- I'll always remember your kindness and the extra effort you put into my gift! Thanks!
I've been in love with this fabric ever since Jill showed it on her blog in September. The colors are just beautiful! I can't wait to put something together with it. Right now I'm leaning toward the design Twin Stars featured in the original Jelly Roll Quilts book. I haven't cut any fabric yet, I'm still making sure it's what I want to do.
Monday, November 8, 2010
100 blocks blog tour -- come see!

Thursday, October 28, 2010
Mama Bear Quilt
 Mama Bear Quilt
Thanks to Amy for hosting the Blogger's Quilt Festival -- what a great event! Here's my entry this fall -- my Mama Bear Quilt.
Several years ago, my sister's life was suddenly changed forever by a brain aneurysm and a previously undetected AVM. It was devastating to our whole family to have her struggle on the brink of death. We powerless to do anything. I was thousands of miles away -- with nothing I could do to help. Some days she was so sick, she couldn't even talk on the phone.
So, I did the only thing I could think to do -- I made her a quilt. As she faced months of surgery and struggles, I packaged all my love into this quilt for her. Every cut, stitch, and seam was made with her in mind. I made it long enough to cover her from head to toe -- at that point it was the largest quilt I'd made. It took some time, but I was finally able to send it to her.
My sister made it through. Today, you'd never know she ever faced such a physical challenge. Every day I'm grateful she's here and healthy. Words cannot convey how important she is to me.
Years later, long after my sister had recovered, she had it on her daughter's bed. It reminds me now that even when we think life is at it's worst, it can always get better and brighter.

Thursday, August 26, 2010
Schnibbles progress

Sunday, July 18, 2010
Schnibbles Plan C
 I recently purchased the book Schnibbles Times Two and I'm in love!
 Bruschetta
 We've had a bug eating our basil this year, but I was able to get a few leaves to use for homemade Bruschetta. Usually meant as an appetizer, our family eats Bruschetta as a meal on Sunday afternoons in the summer. When the tomatoes are ripe, I just can't get enough! The recipe says 16 servings, but my family of four usually eats about two-thirds of a batch when we serve it up as the meal.
Bruschetta
2 tomatoes, diced
2 cloves fresh garlic, minced
1 tablespoon minced fresh basil
1 tablespoon balsamic vinegar
1/8 teaspoon kosher salt
two 16-inch-long French-style baguettes
3 tablespoons extra-virgin olive oil
1. Stir everything but the baguettes and oil in a small glass or ceramic bowl, and let the mixture rest for at least 10 minutes at room temperature.
2. Slice the baguettes about 3/4-inch thick, on the diagonal. Brush one side of each slice with additional olive oil.
3. Place slices oil-side-up on a baking sheet, and broil (carefully!) just until the slices are lightly browned. Remove them from the broiler and place in a serving dish so that the bottoms don't get soggy.
4. When ready to serve, place about 2 to 3 teaspoons of the tomato mixture on top of each slice of bread.
Servings: 16
Nutrition Facts
Serving size: 1/16 of a recipe (1.8 ounces).
Amount Per Serving:
Calories: 108.86
Total Fat: 3.63g
Saturated Fat: 0.61g
Cholesterol: 0mg
Sodium: 191.17mg
Potassium: 85.34mg
Total Carbohydrates: 16.13g


