Showing posts with label fantastic voyage. Show all posts

Wednesday, August 19, 2009

Fantastic Voyage Step #7

If you've been following along for the Fantastic Voyage quilt, we've reached step #7 -- putting the top together. I love this step! It always makes me feel like the time and creative energy was worth all the effort.
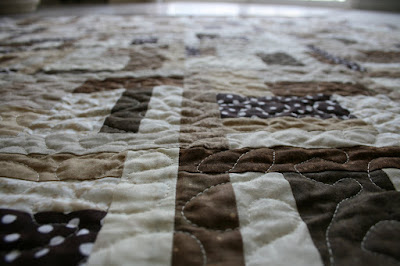
The trick to getting your top together correctly for this pattern is alternating the orientation for every block. The outside strips should be at 90 degrees from each other. It's easiest to look at the picture and figure it out. Promise!
I liked sewing two blocks together and then two additional blocks and so on. Then it's easy to iron them and stack them and then proceed to sew two to two. The four to four.
The final strips will each have 8 blocks. You should have eight strips of eight blocks each. By the time the entire quilt is assembled, it will be 8 blocks x 8 blocks.
That all came out a bit confusing sounding, but it should be pretty easy to interpret I hope.

Monday, August 10, 2009

Fantastic Voyage Step #6

I love getting to the part where it all starts to come together!

In this step, you're going to add the 1.5 x 8.5 inch strips to the side of each block. Use two strips of the same color for the frame on each block. It helps to give the quilt a small bit of consistency and definition.

Take your block as it is, then add one strip to the left, and one to the right. I did not use chain sewing on this step -- I wanted to make sure I was duplicating the correct color.

As always, iron each block. I have to lay mine out on the floor as I iron so that I can see the effect of the quilt as it starts to emerge. LOVE IT! This part always makes me feel warm and fuzzy!

Fantastic Voyage Step #5


You are going to sew two of your small blocks together in opposite directions. If you look at the picture above, you can see that the large pieces to the side end up on opposite ends from one another. This is what helps to give it such a scrappy look.

For this step, again you need to make sure that all the blocks look the same when you finish sewing them. The easiest way to do this is to set them into a stack, all facing the same way. When you pick up two to sew together, turn one so that it is in the opposite direction and then sew. Again, I used chain sewing to make this go really fast. After sewing the two halves together, iron and lightly starch them. It will make every step after a bit easier.

You should end up with 64 blocks -- our final number!

This step took about an hour.

Thursday, August 6, 2009

Fantastic Voyage Step #4

Step #4 -- It's starting to come together! Stack your mini-blocks all together. Turn the stack so that you have it with piece C on the bottom. Place another piece C (2.5 X 4.5) next to the piece you have already sewn. It should look like the block in the picture above. Sew with right sides together. Duplicate for all 128 blocks.

Iron and open.

I'm realizing that I may not have enough pictures for visualization. If someone actually reading this would like more detailed pictures, let me know.

Fantastic Voyage Step #3


Step #3 is also fairly easy. There's only one trick -- sew everything on the same side. Lay out your pieces from step #2. Next to them, place your stack of Piece C fabric. You're going to sew Piece C to the long side of your two pieces with the right sides together. It will make three parallel seams.

If you don't sew all the pieces on the same side, the next step in the quilt will not work properly. So use caution!

Iron open and starch. When finished, you should have 128 building blocks for your quilt that have three strips of fabric in each.

Wednesday, August 5, 2009

Fantastic Voyage Step #2

Step #2 is easy and fun. All you do is take two Piece A strips -- these are 1.5 x 4.5. Sew them together down the long side. I used the chain piecing method(where you don't cut the thread between each set of strips. That way it only took me about one hour to finish this step.
When you are finished, iron and starch as desired. I like stacking in groups of 10 so that I can be sure all 128 building blocks are there.

Fantastic Voyage Step #1

The first step in making this quilt is to cut all the little pieces. If you cut them all in the beginning, the quilt is a speedy assembly.
You can start with 12 half-yard pieces of coordinating fabric. Or, you can use two honey-buns and one jelly-roll (the pre-cut Moda fabrics). Either way, you're going to be cutting them into these same little pieces.
First, iron and starch all fabrics for a smooth start to cutting.
Then, prepare the following pieces:
Piece A --
  • 1.5 inches wide by 4.5 inches long
  • you will need 256 of these pieces
  • Pre-cut fabrics -- cut seven Piece A sized strips from each of the 40 fabrics included
  • Half-yard method -- cut three strips that are 1.5 inches wide from each of the twelve fabrics. Then cut those at 4.5 inch intervals. You will need eight Piece A to be cut from each 1.5 inch strip

Piece B --

  • 1.5 inches wide by 8.5 inches long
  • You will need 128 of these pieces
  • Pre-cut fabrics -- cut four Piece B sized strips from the second package of honey bun fabrics, making sure to use each of the fabrics included
  • Half-yard method -- cut two 1.5 inch wide strips from each fabric. Select two fabrics and cut an additional 1.5 inch strip from each. Then cut all of the 1.5 inch strips into pieces that are 8.5 inch long strips. You should get five Piece B's from each 1.5 inch strip
Piece C --
  • 2.5 inches wide by 4.5 inches long
  • You will need 256 of these pieces
  • Pre-cut fabrics -- cut seven Piece C sized strips from each of the 40 fabrics included in the Jelly Roll package
  • Half-yard method -- cut three strips that are 2.5 inches wide from each of the twelve fabrics. Then cut those at 4.5 inch intervals. You will need eight Piece C to be cut from each 2.5 inch strip

Phew! That's quite a bit of cutting. I believe the cutting took me about 2.5 hours to finish.

Saturday, July 25, 2009

Fantastic Voyage Quilt

Fantastic Voyage measuring 65 X 65

I made this quilt for my mother-in-law to thank her for watching my kids for a week. I wanted her to have something special to help her remember just how much we love and appreciate her.
It was very unusual for me to do this kind of quilt -- normally I stick to traditional geometric shapes and patterns. Also, I use pastels and fruity type colors. So, this was stepping pretty far out of my comfort zone. As I worked on it, I kept asking myself, "Does this look OK?" or "Is this going to work???"

I think in the end it turned out very nice. The random patterning actually appeals to me now -- I think I'll be trying more like it in the future.

I like this quilt so much, I'll be putting a tutorial up in step-by-step form for you to use at your leisure. It will use pre-cut fabrics to make it even easier! Yeah! I love easy. I wish I had thought to use the pre-cut fabric before I cut all those little pieces by hand!