
I did pretty well following last week's meal plan. I moved one or two days around, but otherwise stuck to the plan and used the food in the house. I've been stocking our freezer the last few weeks and it's time to use what we've got. Here's the plan for this week:
Sunday -- BBQ Bacon chicken with yummy potatoes
Monday -- Chicken Rice Salad
Tuesday -- Garlic Parmesean Chicken with fettucini
Wednesday -- Chicken Tacos with black bean salsa
Thursday -- Calzones
Friday -- Pizza from Illiano's
Saturday -- Tempura chicken with rice and a salad
Sunday, April 26, 2009
Wednesday, April 22, 2009
My Greedy Quilt

Blooming Nine Patch pattern,
measures about 60 X 68 inches
There is a great online quilt festival happening at Park City Girl -- I decided to enter one of my favorite quilts -- My Greedy Quilt.
Back in May 2003, I was really sad to hear that a friend was planning on moving away. She was so much fun! It was going to be devastating to have her go off to a new city. So, I thought I'd make her a quilt to help her know I loved her and would really miss her when she was gone.
It took me a few weeks to make, and by the time I had it together my friend had moved away. Sadly, it was just too easy to keep it instead of mailing it to her new address. I know it says terrible things about me, but I really do love this quilt. I couldn't let it go. I use it almost every night to relax and watch tv. Does it make it better that I think of her almost every day????
For those interested in the design, it is an alternating pattern of squares and nine-patches the same size. Pick the fabrics by making sure that there are three colors that match as it "blooms" out. That's what produces such a lovely blended look -- I used six different fabrics in this version. Sew the strips of square then nine-patch in strips, and sew it all together on the diagonal. The two ends of each row are triangles. I then finished it off with a small border of the same fabric to give it a strong finish.
Saturday, April 18, 2009
Menu plan for next week
Here's my menu plan for next week. I've linked to the recipes if you're interested in any of the items. I'll add pictures as I can so that you can see what it looks like if you're curious.
Sunday -- Roast, Potatoes and salad
Monday -- French Dip and salad
Tuesday -- Calzones
Wednesday -- Chicken Pot Pie, rolls
Thursday -- Chicken Fajitas
Friday -- Pizza and salad
Saturday -- Stromboli and salad
Sunday -- Roast, Potatoes and salad
Monday -- French Dip and salad
Tuesday -- Calzones
Wednesday -- Chicken Pot Pie, rolls
Thursday -- Chicken Fajitas
Friday -- Pizza and salad
Saturday -- Stromboli and salad
Stromboli My Way

I love Stromboli -- I stink at making it.
The traditional Stromboli is meat and cheese rolled up together inside bread dough, then baked like a log and then finally sliced. When I bake it in a log, it comes out soggy on the inside and the dough is never fully cooked. A long time ago, I went to a Pampered Chef demonstration where they made pepperoni pinwheels. A-ha! No more soggy Stromboli. Slice before baking, that's the ticket!
The recipe below will feed 3 adults, with 3-4 slices each. It is a very filling meal. You can add any meats/cheeses or veggies that you like. I have to say though, the veggies add liquid which again adds to the main problem of soggy Stromboli. I prefer just meat and cheese -- I get my veggies from dipping it in the spaghetti sauce :) Note: This recipe is one of those that the whole is greater than the sum of it's parts. In other words, it's much tastier than it first appears by the list of ingredients. It has a wonderful buttery, sweet and spicy tang to it.
Stromboli
1 package Pillsbury Crescent Rolls
3-5 slices honey ham
15 slices pepperoni
1 cup mozzarella cheese
1 cup spaghetti sauce
1. Roll crescent rolls out flat. Use a rolling pin to smooth the cracks or perforations until the dough is like one piece. Roll it out a bit so that you have a large rectangle.
2. Place the ham in one layer covering the entire space of the dough.
3. Place the pepperoni in two rows.
4. Cover the entire thing with the shredded mozzarella.
5. Roll tightly.
6. Slice into 1 inch pieces and lay flat on a cookie sheet -- so you can see the swirl.
7. Bake at 350 for 15-20 minutes or until light golden brown.
8. Serve with spaghetti sauce for dipping.
Wednesday, April 15, 2009
Digital Scrappers Rejoice!

I recently found this great blog -- Scraps by Andrea. She posts FREE digital scrapbooking kits almost every day. These are no measly little kits. Today's offering has 37 elements & 12 papers. That's a lot of stuff!
Thanks Andrea!
Tuesday, April 14, 2009
Garlic Parmesean Chicken
 We had this for dinner tonight -- yummy! It's a definite repeat. Don't be afraid of the buttermilk soak -- it makes it tasty!
Garlic Parmesan Chicken
6 chicken breasts
2 cups milk
2 tablespoons white vinegar
1 packet dry Italian dressing(I used Garlic & Herb by Good Seasons)
1 packet dry Italian dressing(I used Garlic & Herb by Good Seasons)
1/2 cup Parmesan cheese
3 tablespoons butter
1. Mix vinegar and milk. This will make buttermilk.
2. Soak chicken in milk for 30 minutes or up to 24 hours.
3. Combine Parmesan cheese and Italian dressing, set aside.
4. Melt butter.
5. Remove chicken from milk, dip in melted butter.
6. Dip chicken in dressing mixture
7. Place in greased baking dish. Top with any remaining dressing and butter.
8. Cook at 400 for 20 to 25 minutes, or until chicken reaches 165 degrees.
Goes great with Alfredo and a garden salad.
Tenderizing Chicken
I've been interested in the tenderizing of chicken and done some research into the subject. Almost every recipe for fried chicken requires soaking in buttermilk from 30 minutes up to 24 hours. Why???
Well, there are proteins in dairy products that break down the cell walls of the chicken. That is what makes it more tender. Each of the milk products give a slightly different taste to the chicken. You could use milk, buttermilk, sour cream, or yogurt for the same effect.
What if you want a tasty tender piece of chicken, or to tenderize an entire chicken and don't want to spend the money on that much buttermilk???
A cold, salted water bath for 20 minutes will do the same thing. This is commonly known as a "brine." You've probably done it to your turkey's each Thanksgiving without having any idea why. Tender and juicy -- that's the reason.
Monday, April 13, 2009
White Bread
 I can't believe the grease spots on my walls! UGH! I didn't know they were there until I looked at this picture -- guess that's another cleaning project on the to-do list!
 My favorite white bread is really a combination of the Jewish challah bread and white bread. I like my bread with egg and milk, I think it gives it more flavor without having to use a starter. It took me about six months of playing with this recipe to get it where I wanted it.
Now, I just dump it in the bread machine in the order listed and put it on dough. I DO NOT bake it in the bread machine -- what a yucky crust and I don't think bread should come in a square with a hole in the bottom, just not natural if you ask me.
This bread takes about 5 minutes to prep and dump. Then about 2 minutes to shape into loaves. Not shabby! It means I'm more than willing to make homemade bread because it's not a tax on my time.
Darcy's White Bread
1 cup milk, scalded
2 eggs
1/3 cup olive oil
1/3 cup honey
1 1/2 tsp salt
3 1/2 cups bread flour
3 tsp yeast
1. First, scald the milk in the microwave by heating it for about 1 minute.
2. Add the oil and honey to the milk to cool it a bit. Stir thoroughly.
3. Add the eggs, salt, then flour, then yeast. Turn bread machine to the dough cycle and let it go -- check during the first kneading process to make sure the dough has enough flour to 'clean' the sides of the dish. If it needs more flour, slowly add by the teaspoonful until it is cleaning the sides of the container.
4. When the dough cycle is finished, remove and punch down dough. Form into two loaves. Place in greased baking pans. Let rise for about 45 minutes.
5. Bake at 350 for 25-30 minutes, or until internal thermometer reads 180 degrees. I usually put aluminium foil on the top about 15 minutes into the baking time so that the tops don't get too dark.
6. Remove from pans immediately and transfer to a cooling rack.
Black Bean & Sausage Soup

I originally found this recipe in a Weight Watchers 5 ingredients book. I added a couple of things to make it more flavorful and bulky.
This soup is great when served with empanadas or quesadillas.
Kielbasa & Black Bean Soup
3 cups celery chopped
2 cans tomatoes, diced
2 cans black beans
2 cans chicken broth
2 cups salsa
16 oz kielbasa
2 cups green bell pepper seeded and diced
1. Place chicken broth, salsa and tomatoes in a large soup pan on medium-low heat.
2. Chop celery and peppers and put them in the pot to stew.
3. Rinse black beans well, add to pot.
4. Cut kielbasa into very tiny pieces. Brown in frying pan until a slight golden crust appears. Then place into the soup pot.
5. Simmer soup for at least one hour to blend flavors well.
Souper Wednesday
I'm a huge fan of soup. It's my lunch almost every day. Not soup from a can though -- I actually can't stand the stuff -- homemade soup is the only way to go. It's healthy. It's full of veggies, protein and 'good things'. I usually make what I refer to as a 'vat' of soup -- 8 quarts to be exact. After the soup is finished and cooled, I vacuum seal and freeze 12-15 portions for eating another day.
It's easy to microwave or heat the frozen soup on the stove. To complement the meal, I'll make homemade bread once or twice a week. Finish it off with strawberries for dessert and it's a well rounded but tasty meal.
Total prep time is about 10 minutes to put it all together if I'm just reheating.
The best part -- I save money! Lots of money because I'm not tempted to stop for fast food when running my errands in the morning. I know I have a good, inexpensive meal ready to go at home, no work required.
I usually reserve Wednesday for making soup. Each recipe takes about 30-45 minutes of prep time, but a total cooking time of 2 hours. Blocking the time on my calendar three weeks out of the month, and I have over 30 portions to last me all month long. It also serves as a back-up dinner if I just don't feel like cooking at all.
I'll be giving you my favorite recipes over the next few weeks, so stay tuned!
Wednesday, April 8, 2009
Alabama White BBQ sauce

picture courtesy of Southern Plate
Introduced to this new sauce here and here, I just couldn't pass it up. It needed to be tried. Oh, I'm so glad I did! It's tangy, sweet, lemony and wonderful.
The first bite is odd -- I'm not going to lie. You think it's going to be Ranch dressing and it's just not. It's very different, but very good. It becomes addictive quickly. I have only served it with the roasted potatoes, but I think it would be great as a veggie dip, a salad dressing or a marinade. Oh, we've also dipped rolls and potato chips in it too. Also good. You could probably dip nails in it and they would taste good.
I've given you measurements for two different sized batches. I'd only make the large one if I was serving a crowd or using it as a marinade. If you're just going to dip, the small batch is fine.
Alabama White Barbecue Sauce
large version
2 C Mayonnaise
1 1/2 T salt
2 T black pepper
6 T white vinegar
6 T lemon juice
4 T white sugar
Mix all ingredients together and stir well.
Alabama White Barbecue Sauce
small version
1/2 C Mayonnaise
1/4 teaspoon salt
1 1/2 teaspoons black pepper
1 1/2 tablespoon white vinegar
1 1/2 tablespoon lemon juice
1 tablespoon white sugar
Mix all ingredients together and stir well.
small version
1/2 C Mayonnaise
1/4 teaspoon salt
1 1/2 teaspoons black pepper
1 1/2 tablespoon white vinegar
1 1/2 tablespoon lemon juice
1 tablespoon white sugar
Mix all ingredients together and stir well.
Simple Roasted Potatoes
 These roasted potatoes are very yummy! I love that they take 2 minutes prep time and I'm able to move on to the next item on the menu. Recently, I served them to some dinner guests. I cut up 3 small red skin potatoes for each person regardless whether adult or child. At the end of dinner, the potatoes were long gone.
Simple Roasted Potatoes
1 pound red skin potatoes
olive oil
garlic salt
Parmesan cheese
Cut potatoes into 6 or 8 wedges depending on the size of the potato. Drop immediately into a baggie with about 1/4 cup olive oil in it. I don't measure this, it's just two 'glugs' from my giant olive oil jar.
Coat potatoes with oil.
Line up on a baking sheet with the peel side down. If you lay them on their sides, only one side will get crispy.
Sprinkle garlic salt and Parmesan cheese on top of the potatoes.
Roast at 375 for 45-60 minutes depending on your preference for crispy or soft potatoes.
Book: The Deed of Paksearrion

Title: The Deed of Paksenarrion
Author: Elizabeth Moon
Pages: 1024 -- it's three books in one binding
Genre: Fantasy
Warnings: There is violence. There are a few pages that I don't read at all from page 969 to 980. I start at the top of 981. I know of yucky things, I don't like to read about them.
What seems like a long time ago, in a galaxy far, far away I had a friend named 'Doc.' I honestly don't know if he had a real name. That's what everyone called him. Anyway, he worked for a newspaper where I was doing training and we became friends. He put together a list of book recommendations for me that pushed me outside my normal reading comfort zone. The Deed of Paksennarion was on that list. I'll admit, it took me a while to warm up to the idea of reading fantasy. I've never liked it until I had Doc's recommended list and convinced myself to give in and try reading a bit of the genre.
I love this book. It's one I read at least once every year. It is my favorite book of human triumph over evil. I love the strong female character and the inner fight that she wins through her faith and they way that she is respected by others within the book. Give it a try -- you might decide you can read fantasy every once in a while too!
Find your Frost Date
This year we have decided as a family to plant a garden. Given my past history of killing plants, being allergic to plants and my overwhelming fear of creepy crawly things, this is a very big deal for me. I've been debating the pros and cons constantly for two weeks. On top of all of those personal hang-ups, it costs significant cash to start a proper garden here. I'll detail the exact cost sometime in the next week, but it is a staggering amount.
There is also a significant amount of knowledge required to start a garden. Luckily a wonderful woman at Lowe's stopped me from running out and sticking tomato plants in my garden two weeks ago. They'd be black and withered by now from the frost. Yeah, I should have known about the frost. In my defense, I grew up in Utah where gardening can be started earlier than in Connecticut. And, again, I have killed many poor plants in the past.
The Lowe's lady taught me about my "last frost date" -- the date that is the average date for the final frost of the year. After your last frost date, you are safe to plant many of the summer veggies. Also, seed packets often say, "Plant three weeks prior to your final frost." If you don't know when that is, you are setting yourself up to either kill your plants with frost or heat depending on the plant's required temperature. For a great reference site, see the Frost Date Selector to find your local frost date.

One other tip from the Lowe's lady -- every area of the country has a particular plant to watch. When that plant blooms, it's safe to put in your summer veggies like tomatoes. Cool, huh? Our plant here in Connecticut is Forsythia a beautiful yellow flowered shrub. When you see the yellow blossoms, go for it! Plant those tomatoes and bask in the sunshine they require! If you don't live in Connecticut, I recommend finding your own "Lowe's lady" to know what plant to watch for in your area.
Just a final note -- there is also a "first frost" date in the fall. That will also damage plants. So, when that time comes be sure to watch the weather so that you're able to protect your plants from the evil "first frost" and get a few more weeks of veggies from that mighty investment of time and energy you call a vegetable garden.
Tuesday, April 7, 2009
Best Pot Roast EVER!!!!
The best pot roast I've ever had is also one of the easiest. One Sunday, I wanted to make pot roast, but didn't have all the ingredients listed in the recipe I was planning on using. Whittling out what I didn't have, I was happier with the result than I was with the original recipe.
This recipe is really one of those cases where the whole is more than equal to the sum of the parts -- yet again!. It tastes awesome! Be prepared to be underwhelmed by the ingredient list:
Darcy's Pot Roast
3-4 pounds of roast meat -- you pick the cut
1 cup white grape juice
1 can cream of mushroom soup
1 package dry onion soup mix
Combine juice, soup and onion mix together and stir well.
Pour over the roast.
Bake at 350 for about 2 hours.
Test for your texture preference and color.
Tip: The leftovers work well shredded for French Dip Sandwiches
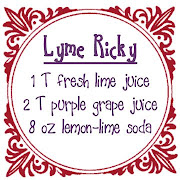
Lyme Ricky????
Just like my favorite drink, I am a mix of many things -- a mother, quilter, piano teacher, baker, penny-pincher, friend and daughter.
I like to think that I am a case where the whole is greater than the sum of it's parts.
I don't excel in any one area, but I do try to expand my knowledge base and skills in many ways. I hope that by putting all of my talents and skills together I become a more complete person than if I had just focused on one thing and one thing alone.
So very similar to a lime ricky -- each portion that you add to the drink is tasty on its own. Together, they create magic!
My teetotaller version:
Lyme Ricky
1 tablespoon fresh lime juice
2 tablespoons purple grape juice
8 oz lemon-lime soda
If you're curious about the full info on lime rickys, see here.
Subscribe to:
Posts (Atom)